Daniel Hoelbling-Inzko talks about programming
Building a databound contact form with MonoRail – Part 2: Sending Emails
This is part 2 of a 3 part tutorial on writing a databound contact form with Castle Monorail that gets sent off by email. We already touched FormHelpers and DataBinding in Part1: Views and Databinding, now we’ll see how easy it is to send a email template with MonoRail.
The other parts of this tutorial:
- Views and Databinding
- Sending Emails
- Validation
Sending Emails
We left off with a Thanks controller method that gets a ContactRequest parameter and now should send off the data by email.
1 – Configuring our Servers
Anything involving emails usually requires a SMTP server. The same thing goes for MonoRail, yet MR will default the SMTPServer setting to 127.0.0.1 if you don’t explicitly configure it through your web.config. Unfortunately for me I don’t have a SMTP server sitting on my box, so I had to change that setting through the monorail configuration node inside our web.config:
<monorail smtpHost="smtp.server.com">
  <controllers>
	  <assembly>MonoRail.ContactForm</assembly>
  </controllers>
  .
  .
You can optionally also optionally configure smtpPort, smtpUsername and smtpPassword.
2 – Sending a sample Message
We’ll jump ahead a bit and send a email message right away to verify that our settings so far have been working. Sending emails is as simple as calling the DeliverEmail method from within our Thanks controller action:
public void Thanks([DataBind("FormData")] ContactRequest request)
{
    var message = new Message
                      {
                          To = "[email protected]",
                          From = "[email protected]",
                          Subject = "Hello World",
                          Body = "My first message"
                      };
    DeliverEmail(message);
}
It’s really that easy.
3 – Templating the Message
It’s simple to send emails as seen in step 2, but having to chop strings together to send emails is just awful and error prone. Especially when you want some fancy HTML layout in your emails you’ll want to leverage the power of your ViewEngine to create the email message.
MonoRail provides such a method with it’s RenderMailMessage method. RenderMailMessage takes in a viewname, a layout and a IDictionary of parameters that will get passed on to the view.
For this simple tutorial I chose not to use a layout, so I pass in null. Also make sure you cast your Dictionary to the non-generic IDictionary since there is a little bug with the generic IDictionary overload.
public void Thanks([DataBind("FormData")] ContactRequest request)
{
    var parameters = new Dictionary<string, object>{{"request", request}};
    var message = RenderMailMessage("contact", null, (IDictionary)parameters);
    DeliverEmail(message);
}
MonoRail will look for email-templates inside the Views\mail\ folder, so we’ll add our contact.vm there:
 One thing you’ll notice immediately is that all information about from, to, subject and body have not disappeared from our action method. This data will now get extracted from the view, allowing for easy customization.
To do so we need our view to look like this:
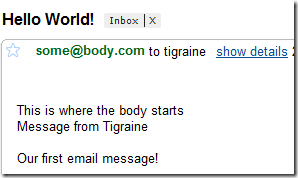
to: [email protected] from: $request.Email subject: $request.SubjectThis is where the body starts Message from $request.Name
$request.Text
MonoRail will extract the information from the to: from: fields and use them to send the message. The above also uses the parameters we passed in to render. $request here refers to the object passed into our dictionary with name request.
If run we’ll end up with a email simiar to this:
4 – Testing it
Email interactions are perfect examples of stuff that goes wrong without anyone noticing. Someone does some changes in the controller and all of a sudden you don’t get those annoying contact requests for a week. Usually you blame it on a slow week and by the time you suspect something is wrong you already ignored a month of customer feedback.
To avoid this we’ll want to unit test this, and while I usually write my tests first – it’s easier to follow if you know the code under test. Testing in MonoRail is quite simple once you know where to look, unfortunately the documentation is scattered and scarce.
We’ll begin by making our testclass derive from BaseControllerTest, a class inside the Castle.MonoRail.TestSupport assembly that is used to facilitate testing.
public class ContactBehaviorTest : BaseControllerTest
{

}
This provides us with a neat little function that allows us to sandbox our controller called PrepareController.
Testing that a message has been rendered through the template engine would therefore look like this:
[Fact]
public void Thanks_RendersTemplatedEmail()
{
    var controller = new ContactController();
    PrepareController(controller);
    controller.Thanks(null);
    Assert.True(HasRenderedEmailTemplateNamed("contact"));
}
This test merely verifies that a template was rendered, but we probably want to verify that the view gets passed the correct arguments:
[Fact]
public void Thanks_MailRendering_ParametersGetPassed()
{
    var controller = new ContactController();
    PrepareController(controller);
    var request = new ContactRequest();
    controller.Thanks(request);
    var parameters = RenderedEmailTemplates[0].Parameters["request"];
    Assert.Same(request, parameters);
}
We now have verified that the “request” parameter object is indeed the one passed into the action method. This is not perfect since we’d just want to verify that the correct values get passed around, not references. But for this tutorial this will suffice.
Next on our checklist should be the fact that the created message is indeed sent off. We do so by using the StubEngineContext our BaseControllerTest provides us with:
[Fact]
public void Thanks_EmailSending_SendsOutOneEmail()
{
    var controller = new ContactController();
    PrepareController(controller);
    var context = (StubEngineContext)Context;
    controller.Thanks(new ContactRequest());
    Assert.Equal(1, context.MessagesSent.Count);
}
This now simply verifies that we did indeed send a mail message.
Now we have a fully working contact form that gets sent off by email through a template. We may want to protect that form from bad input by validating some of our fields. Check back tomorrow for part 3 of this tutorial.
Ps: As always the source for this tutorial is available in my BitBucket samples repository. Usually one changeset represents one tutorial step.


