Daniel Hoelbling-Inzko talks about programming
Building a databound contact form with MonoRail – Part 1: Views and Databinding
In this tutorial we will look the steps necessary to create a form with Castle MonoRail that then gets sent off by email. It will touch FormsHelpers, DataBinding and using the EmailTemplateService to style and EmailSender to send a message.
The tutorial will probably be split into three parts:
- Views and Databinding
- Sending Emails
- Validation
Views and Databinding
I assume you already have a (maybe blank) MonoRail site running, if not you could check out this changeset on my sample-repository where the MonoRail sample app is still pristine.
1 – Creating the Controller
There are two components to a contact form: The form and the thanks screen.
In MVC speech that means we’ll have one Index action just serving up the view, and one Thanks action doing the email sending / heavy lifting.
Anyway the controller for now looks fairly simple:
public class ContactController : SmartDispatcherController
{
    public void Index()
    {

    }
}
2 – Creating the View
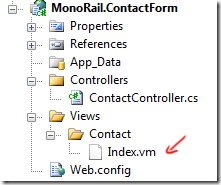
 The usual routine for creating MonoRail NVelocity views applies here. The \Views\<controllername>\<actionname>.vm convention dictates that our View is called “Index.vm” and placed inside the \Views\Contact\ folder
(Btw, you probably want to tell Visual Studio to open .vm files in HTML view with Rightclick .vm file –> Open With –> select HTML Editor –> Hit Set as Default)
Inside the View we need textfields for Name, Email and Subject. And of course one big textarea for the user’s text.
We all know how HTML works: we could go ahead and build a nice accessible form by putting together <input type… tags there and hand-coding everything ourselves. Or we’d just rely on the MonoRail FormsHelper to provide methods to generate the inputs for us:
<form method="post" action="$UrlHelper.For("%{action='Thanks'}")">
<fieldset>
    <legend>Contact Form</legend>
    <ol>
        <li>$FormHelper.LabelFor("FormData.Name", "Name")
        $FormHelper.TextField("FormData.Name")</li>
        <li>$FormHelper.LabelFor("FormData.Email", "Email")
        $FormHelper.TextField("FormData.Email")</li>
        <li>$FormHelper.LabelFor("FormData.Subject", "Subject")
        $FormHelper.TextField("FormData.Subject")</li>
        <li>$FormHelper.LabelFor("FormData.Text", "Message")
        $FormHelper.TextArea("FormData.Text", "%{rows='14', cols='0'}")</li>
    </ol>
    <input type="submit" id="submit" value="Send" />
</fieldset>
</form>
Note the $FormHelper.TextField(“FormData.Name”)call that results in a <input type="text" id="FormData_Name" name="FormData.Name" value="" />. One nice side-effect of using this helper is that it will look at the current request parameters and if a FormData.Email value is set display it as the textfields value.
Also Interesting here is the syntax NVelocity uses to specify Dictionary data inside the view: “%{key=’value’}” specifies a IDictionary that gets passed off to our helpers.
3 – Creating the DTO
A contact-request is a message, so I like to have a data-object to represent that message during processing. This also makes it easier for us to retrieve the inputs sent from the Form (more on that later).
So we create a class called ContactRequest in the Models\ folder that can easily hold our form data:
namespace MonoRail.ContactForm.Models
{
    public class ContactRequest
    {
        public string Name { get; set; }
        public string Email { get; set; }
        public string Subject { get; set; }
        public string Text { get; set; }
    }
}
4 – Databinding the DTO to our Form
You may have noticed that I named all TextFields in step 2 FormData.something where something corresponds to the fields inside the DTO from step 3. FormData is just a arbitrary string to prefix all of my inputs, where the latter will be used by MonoRail’s DataBinder to map the values onto my DTO.
We just need to instruct MonoRail on our action method to bind to all Query parameters starting with FormData and stuff them into our ContactRequest object. Our controller now looks like this:
public class ContactController : SmartDispatcherController
{
    public void Index()
    {

    }

    public void Thanks([DataBind("FormData")] ContactRequest request)
    {

    }
}
If we debug into this action you can see that the request parameter gets filled by MonoRail with the values from the Query:
Since we now have a Thanks action on our Controller we also need to create a Thanks.vm view inside our Views\Contact\ folder. A blank one will do for this tutorial.
Now that we have the form up and bound our DTO to it, we’ll continue in our next tutorial step with rendering and email and sending it.


