Tigraine

Daniel Hoelbling-Inzko talks about programming

Compiling ViM on OSX with Ruby support

I just wanted to quickly point you to this link in case you need ViM compiled in a way that allows you to run the awesome Command-T plugin: http://arjanvandergaag.nl/blog/compiling-vim-with-ruby-support.html

Without Command-T I couldn't use ViM, it's just too convenient.

Filed under vim, ruby, osx

Random PC freezes and reboots under load

I just switched some components on my computer to get some more speed out of my photography retouching workflow. Since I really hate waiting for Lightroom I opted for a really beefy i7-5820K with a pretty oversized motherboard and plenty of ram. I kept my trusty Geforce GTX 760 TI all of my peripherals - but the 6 (12 logical) cores really ought to speed up my workflow.

So I ordered my stuff and assembled it - even upgraded my case from a Midi-Tower to a Full-Tower to get better air-flow and cooling to my hard drives. I spent way too much time tidying up cables and making the whole build really solid. Everything worked flawlessly at first. Until the next day where I was scheduled for a meeting with a client at 4pm and wanted to transfer some images to the iPad to show during the meeting.

So I spun up Lightroom, selected some of my favourite images from last weeks wedding and hit Export like I did a thousand times before. But this time the computer just rebootet after a few seconds.

Ok so I was royally screwed, I retried immediately and the computer froze once more. Looking into the Eventlog I found a critical Kernel-Power 41 error without any useful description whatsoever.

At that point I had to quit and get to the meeting - without the images, but when I came back and searched a bit online Idiscovered that Kernel-Power 41 can mean a multitude of things, but mostly that the system did not cleanly shut down and that most likely a Power-Supply-Unit issue is causing it.

So I did the math on my components and found that the rig should run at peak power consumption somewhere around 520 Watts - with a bit undersized 550W PSU installed (your PSU should have around 30% headroom over the peak consumption to be able to absorb spikes without any issues). So I frantically searched for a new PSU and got myself a 750W beQuiet! unit. After another hour of routing all the cables and making sure everything is neat and tidy inside my case I turned on the computer - ran a Lightroom export and the system crashed once again :(.

This time I was sure the PSU is fine (and probably has been fine all along) and I looked at the Graphics-Card and the RAM for the culprit. I re-installed everything once more to make sure all the leads are connected correctly and the system still froze.

Next up I decided to reset my UEFI-BIOS to factory defaults and try again - to no avail. Until I decided to disable the Intel XMP RAM overclocking that was being applied and voila - the system is stable under extreme loads! So apparently G.Skill has screwed up somewhere with their G.Skill Ripjaws 4 3000mhz kits and the XMP profile configured by my BIOS was causing system

Turns out: Enabling the XMP Profile for my RAM did not disable the Turbo-Boost. It only overcloed the System to 3.6ghz, but whenever Windows decided the System could use some more Horsepower it instructed the CPU to go into Turbo-Boost which overclocked the overclocked system by another 30%. Needless to say that was outside the safe range for the RAM and the system crashed. I noticed this for the first time after disabling the XMP profile and monitoring my RAM under load - it was already running at 3ghz without the overclock settings in the BIOS.

And: Having your system randomly freeze and reboot at various steps of your Windows updates also sucks - I am now stuck with a failing Windows .NET Framework 4.2 updatee and can't upgrade to Windows 10 :(

Filed under windows, pc

Formatting Date and Times in Rails

When looking at formatting Times and Dates in a certain format one quickly looks at strftime for help. Only problem there is that strftime will not take into account the translations configured through Rails I18n gem. So a german representation of 10. Oct 2015 will not render correctly since October is abbreviated in german as Okt.

A solution would be to just define the format pattern through the I18n translations inside the yaml files in config/locales/ - but often you have formats that are set just this once, so externalizing them is not really a good solution.

Looking at the I18n gem the solution is quite easy: I18n.localize(<date>, format: '%d. %b %Y') yields the appropriate result while passing in the localization format. So just replacing the date.strftime(<pattern>) call with I18n.localize(date, format: <pattern>) is the way to go.

You can also pass in the locale you want it formatted in using the locale: :de parameter to localize.

Hope this helps.

Filed under rails3, rails, i18n

Ruby Time.strftime pads %e with whitespace

I just ran into this quick issue so I thought i'd share it.

When trying to create a Date format for Rails i18n.l you are at the mercy of Time.strftime and my format was supposed to look like this: "%e. %b %Y" - so the quite common 1. Jul 2015. According to the excellent http://www.foragoodstrftime.com/ %e should give me the non-zero-padded day of the month - but my tests still failed because of a leading whitespace on days < 10.

Looking at the reference I noticed that strftime allows flags for each replacement to modify how padding and other things work. The solution to getting rid of the whitespace was to change the format to this: %-e. %b %Y.

Here is the list of flags from the documentation:

-  don't pad a numerical output
_  use spaces for padding
0  use zeros for padding
^  upcase the result string
#  change case
:  use colons for %z

The flags just go after the % and before the format directive. Hope this helps.

Filed under ruby, i18n, rails

Razer Black Widow Ultimate Review

I have been putting this review off for a very very long time since purchasing the Razer Black Widow Ultimate, (in fact it's been almost 3 years since I got mine), but since friends keep asking about the Keyboard I thought I could save myself a few keystrokes here.

So, short and sweet: Is it any good?

YES

I don't know how many times this has already been said (see Jeff Atwood for example), but keyboards matter. And having a great keyboard is one of the most important things to me personally.

So after 6 worn out Microsoft Natural 4000 Keyboards, some intermediate Razer and Logitech keyboards, I decided to bite the bullet and jump on that new "mechanical" keyboard wagon to test it out and got the Razer Black Widow Ultimate. And god this thing changed my life!

When you first type on it (or any mechanical keyboard for that matter) it's this "HOLY CRAP" moment when you remember how typing felt back on those IBM keyboards in your youth. The keys travel perfectly uniform, with exactly the right amount of pressure and a satisfying click at the end. Let's just say the typing is sublime. It's just plain better than conventional keyboards - period.

Now we have established you need an mechanical keyboard, but do you need the Razer Black Widow?

Yes, no and maybe. I love Razer products, I swear by my Razer mouse and their keyboards have always served me well before. So I would say the Razer Black Widow is a well build, solid and great looking Keyboard you want to buy. But: Don't buy it for it's gaming features. Buy it for the looks, the build quality and the switches.

Why not for gaming features? Because gaming keyboards are a lie - Gaming keyboards are the equivalent of 3D-TVs, just a marketing gag to extort money from you. You don't want an extra row of macro buttons, because you don't need an extra row of macro buttons. That's like putting a second door handle on a door - everything you need out of a keyboard is already there: On or near the WASD keys. No game on this earth expects it's players to have a macro-recording super duper keyboard so all games are designed to work well with a standard keyboard. I have yet to find a game where I actually could not remap the keys in the interface, or had to perform a keyboard input that weird that I had to use these keys - EVER.

Second lie with gaming keyboards is their anti-ghosting technology. Again: You ain't gonna need it. Yes the keyboard may accept more than 4 inputs at the same time, but I have never ever felt that this was a problem with other keyboards which lacked this before. The times where you played multiplayer games by having 2 people use the same keyboard are gone, and for everything else you will never hit any limits even with a 10€ keyboard.

Third lie is the ultra-fast 1ms response time. Who are we kidding? There are no noticeable keyboard delays on regular keyboards, so any improvement on already unnoticeable lag is just snake-oil. But heck, it sure sounds like that's the only thing holding you back in multiplayer games.

Now that we established that I love my Razer Black Widow, but think all the gaming features they market it with are crap, I also have to express my frustration with the Ultimate version of the keyboard.

When I bought it, you could get the Razer Black Widow for around 80€, and the Black Widow Ultimate for 120€. I went for the Ultimate edition, because it has backlight illumination and I liked that. It also has an additional USB Port and a Audio/Mic pass-though. This means in theory you could connect your headset to the keyboard, avoiding problems with cable length etc. The reality is just frustrating: Brainless monkeys designed this feature! They put it on the right side of the keyboard - right where my mousepad starts!. What on earth where they thinking? I am supposed to have cables and USB sticks on my mousepad? Like there is no fucking space anywhere around the keyboard! Actually, there is exact the same space unoccupied on the left side of the keyboard. The whole back of the keyboard is empty. I've seen other keyboards solve this way better! I have had keyboards that even had grooves on the bottom to pass your headset cables below the keyboard so they aren't in your way. And Razer designed theirs so the whole point of the cables is to be in your way.

So in closing: You want this keyboard - it's great. Just make sure you really really want to pay 40€ extra for the illumination - because the rest of the "ultimate" package is just crap.

Filed under hardware, tools, review

The story of NginX, Facebook and ipv6

I just released my professional photography website to the public and was quite content with the setup. The site is running Wordpress on php5-fpm proxied through NginX. I optimized the hell out of the site using w3-total-cache, and the NginX + php5-fpm setup delivers superb performance.

Only Google and Facebook where giving me a hard time with site-verifications and other checks to see if tracking codes are correctly embedded. After digging a bit I noticed that the Facebook Linter was only seeing "Welcome to NginX" which is the default site set up on the server.

So I started taking apart my NginX configuration, testing different things and even though I could access the site correctly using Chrome, sometimes on other computers it would still show the default page. I was puzzled to say the least. Also Chrome makes it exceptionally hard to debug these problems due to being too smart. I had deliberately set up the site to only be available without www and was planning on configuring the 301 redirect, but somehow forgot to - turns out Google did it all by himself and never told me about it. So I was there thinking the site 301 redirects, but instead people with certain browsers ended up seeing the Nginx default page.

Once I realized that curl on my server was also only returning the default page it started to dawn on me. I had set up a AAAA record by default, and NginX was listening for ipv6 traffic, just the photography host was not configured to listen for it. So any requests that came in through ipv6 where hitting the default_server, not the actual host. Once I configured the listen [::]:80; ## listen for ipv6 line in my nginx host configuration everything started to work as expected and also Facebook started to see the page.

So lesson learned: Facebook tries ipv6 if possible, and if your server has a ipv6 DNS record but is not configured correctly, users will see your site (due to the browsers being smart), but crawlers may miss it. So always check v6 connectivity when launching a new site.

Filed under server, nginx, facebook, ipv6, network

CanCan: Beware of symbol conditions

CanCan is probably the most widely used authorization solution for Ruby on Rails, and for good reason. But sometimes weird things happen.

Given the following ability:

can :read, User, role: :developer

I was experiencing the following:

@user = User.accessible_by(current_ability).first
can? :read, @user #=> false ???

As you can see, the accessible_by method was returning the user list just fine, so I obviously had the permission to read the user at this point, but once I asked the authorize! or can? methods about the same user they promptly replied with false.

The culprit here is ActiveRecord's indifferent-access of strings and hashes. Something that had me scratching my head at more than one occasion over the last few years. ActiveRecord doesn't care if the keys in a hash are strings or symbols, so a beginner might be tempted to think Ruby does not differentiate between those.

But Ruby does care, 'test' != :test will return true! Whereas ActiveRecord doesn't care:

User.where('role' => 'developer')
# or
User.where(:role => :developer)

This is due to the heavy use of ActiveSupport::HashWithIndifferentAccess that makes this possible in Rails:

a = {}
a[:foo] = 'test'
puts a['foo'] #=> 'test'

Now if we look at the conditions derived from the above ability you will quickly see the problem:

current_ability.model_adapter(User, :read).conditions
# => { role: :developer }

ActiveRecord doesn't care about the symbol, it will happily return all Users with the role column set to the string developer, whereas CanCan will do the can? check in Ruby, doing essentially this:

puts @user.role #=> 'developer'
# user.role is a string - the condition a Symbol
puts @user.role == :developer #=> false

Conclusion: Always make sure your conditions are valid both in ActiveRecord AND Ruby! Where ActiveRecord and Rails in general promote a sloppy type-free behavior, other frameworks don't necessarily see it that way. So keep in mind that a symbol is not a string!

Also when you know you might get a symbol and want to compare it to a string, don't use .to_sym on the string but rather .to_s on the symbol - symbols don't get garbage-collected, so they will stick around in memory forever. Never .to_sym user input or bad things will happen™!

Filed under ruby, rails, cancan

Focus point tester

I am currently trying to reduce my reliance on the backside display on my camera. All relevant information on the current frame are right inside the viewfinder, so taking the eye away from the finder to fiddle with controls is really unnecessary.

This works reasonably well for normal settings, but I quickly became annoyed with my own clumsiness with the two dials when selecting a new focus point (since there is that handy button next to the shutter).

Canon 70D AF Control Scheme. Image Taken from Canon EOS 70D Manual

So I wrote a little page that helps me practice the AF selection by providing me with a point grid and randomly selecting one point to manually change to while looking through the viewfinder.

You can find it here: http://www.tigraine.at/uploads/focus.html

Filed under photography

Thoughts on photographing fireworks

alt

I have recently rediscovered my love for photography, and have been looking forward to New Year's Eve 2013 for quite some time as I expected to be able to get some pretty spectacular firework shots. The rationale was simple: Photographing stuff with a slow shutter speed is incredibly easy - anyone getting into photography should get a tripod and experiment with low shutter speeds and moving lights. And when applied to fireworks the results look really spectacular.

So I looked at a few places around Klagenfurt (my home town) for one with convenient access and a decent view on the action. I did not want to go too far out on any of the surrounding mountains since the weather had been a bit unpredictable lately, and I figured inside the city I'd at least see some fireworks, even when they are a bit obscured by fog. Outside you could end up with zero visibility on the action.

But still I needed something with elevation, so after visiting a few locations I decided on this nice view from Kreuzbergl:

Kreuzbergl View

I figured the road straight to the city center would give the pictures some depth, while the sky around us should be filled with exploding fireworks.

So at 23:00 our party headed out to the chosen spot and on to my first lesson: Take the whole bag!

I figured I'd best use the EF-S 10-22mm for the fireworks and thought I could save myself the hassle of taking the whole heavy camera bag with me. So I left the camera bag in the car and just took camera + tripod with me. 20 Meters down the road I noticed that I had forgotten the lens hood and darted back to the car. I picked up the lens hood and ran back to where I had left the tripod, just when I remembered that I had forgotten the cable release in the bag too. At that point I decided to just pick up the whole bag and be done with it - really annoying.

Taking the whole bag was a great idea, because lesson #2 presented itself to me at 00:00 - I had not bothered to ask anyone who might know if there are any fireworks at all at Kreuzbergl. So when the new year came, the fireworks where concentrated on the horizon, but there where virtually none in the sky above me (and I was zoomed out to 10mm).

alt

As you can see there where a lot of fireworks in the distance, but none above me. Apparently nobody shoots fireworks in this part of town :(. And I was now stuck with the wrong lens on my camera. Thank god I had taken all of my gear, so I decided to switch to the 70-200.

After changing the lens, screwing it to my tripod and adjusting my exposure I managed to get some decent shots of the fireworks. But the whole process had taken too long, and I missed most of the initial action. My friend next to me who shot at 55 mm focal length managed to get this really awesome shot (while my keepers consisted mostly of crops with one or two fireworks in the distance):

alt

This then led me to lesson #3: Ask around for commercial fireworks.

Around 200 meters behind the spot where I was shooting towards the city center is a really nice restaurant that traditionally shoots a lot of fireworks. I did not know that! They waited a few minutes for the initial burst to die down, and right when I had finished switching from my ultra-wide lens to a telephoto they started lighting the sky right above me.

The fireworks display from Schweizerhaus was impressive. Had I not bothered with the rest of the city, just shooting the fireworks from the Schweizerhaus would have been awesome. Especially since it's location was very predictable, the delay between explosions was essentially fixed and they all exploded at roughly the same height. So if possible, ask around what hotels or restaurants put on a fireworks show and find out where they usually launch theirs. It's a lot more predictable than hoping for random fireworks to appear in your frame.

Anyway, at that point I took my camera off the tripod, and shot the fireworks @70mm 1/200 f/2.8 and got some really nice action shots of exploding fireworks. But once again I had the wrong lens, unable to do the shots I had planned initially.

So to sum up the lessons I learned this year:

  • Take the whole bag - you never know when you need another lens. (I never thought I'd need a telephoto when shooting fireworks!)
  • Either shoot in locations where you know there will be plenty of fireworks in your frame - or ask around.
  • Use the right lens. Great fireworks that cover only 20% of your frame look really unspectacular.
  • Ask for commercial fireworks displays. They are usually well done, their location is quite predictable and once you know where to expect them you can usually find a nice spot to shoot from knowing you'll get some action inside your frame.
Filed under photography

How to upgrade to an SSD with minimal effort

We have all been there - that dreaded family gathering where some relative walks up to you and starts complaining how slow his computer has become and that he needs a new one. In the old days this was a serious problem. They really meant what they said: They need a new computer and you are the only one to make that happen. Go buy and setup a new rig, then spend at least an afternoon installing all kinds of things so the new computer works just like the old one, but moderately faster.

Thank god we got SSDs now, so I can make any computer ten times faster without having to replace the whole damn thing. And there is even a trick how you can migrate from the old hard-drive to the new SSD without you having to reinstall Windows or anything. The trick is to clone the existing drive using a nifty tool called GParted. Here is how it's done:

(It's kind of a long post, but believe me you can do this in less than 20-30 minutes)

Prerequisites

Buy an SSD

Don't waste money on anything fancy. Any SSD will make a PC fly compared to a mechanical drive. So just get a decent drive with the capacity you feel is required and be done with it. (I just got a 240GB drive for 150€ and score a 7.9 in Windows Performance Measurements)

Backup the old Data

As always with disk operations, they might result in lost data if something goes wrong, so please back up any relevant data on the drive you want to copy.

Step 1- Prepare a GParted-Live USB-Key

Get an USB thumb-drive and install GParted-Live using the excellent Pendrive Linux installer. That's simple:

After that it's as simple as selecting GParted in the dialog, pointing it to the GParted iso file and selecting the USB drive letter you want to install your GParted image to.

Step 2 - Delete some data from the original drive

Usually the new SSD will have less capacity than the existing drive (you're usually going from 500GB to 240 or something) so you have to make sure the old data fits on the new drive. Uninstall applications, move data - make sure the used space on your old drive is less than your SSD capacity before proceeding.

Step 3 - Unplug all unnecessary drives

You're going to do some pretty low-level disk operations and any chance you can mess up drive letters is a recipe for desaster. So I like to just disconnect all drives except for the old drive that contains Windows. Just to make it harder to accidentally screw up.

Step 4 - Install the SSD into the computer

Step 5 - Plug in the USB-Key with GParted and boot it

You will soon be greeted by GParted running in a rather hideous Linux GUI.

Step 6 - Shrink the old disk (optional)

If you are trying to fit a bigger old drive onto the new SSD you have to shrink the old partition to a size that's smaller then the new SSD. That's important otherwise you'll screw up the partition table when copying the disks.

Thankfully GParted can do that for almost any file system, even with NTFS. Just select the old partition and shrink it. All partitions together should be less than the new disk capacity - the rest should be unpartitioned space at the end of the disk.

Step 7 - Clone the disk

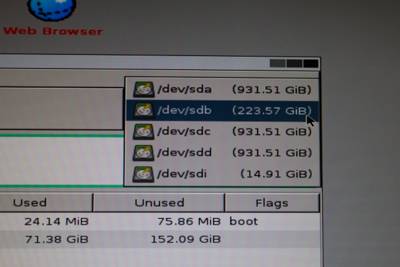
What you need next is to use GParted to find out the drive paths of your old drive and your new one. This can usually be deduced from their respective sizes, but also the new one should not contain any partitions yet.

Just click the drive path to the top right and you will see a listing of all connected hard drives with their linux mount point (/dev/sda is the first one and /dev/sdb the second etc..)

alt

Once you know the respective drive names, open up the Terminal and run the dd command like this:

dd if=/dev/sda of=/dev/sdb bs=100M status=progress

if should point to the old disk and of is the new disk. (if is short for InputFile and of for OutputFile)

Make sure that you get this absolutely right, otherwise you end up cloning the empty disk onto the full disk! Once done just restart the computer and boot once again into GParted.

Step 8 - Grow the new disk.

You are almost done, but you usually have a bit of unused disk space on the SSD left - so you GParted to grow the partition to fill the whole space.

Step 9 - Format the old disk

If you are feeling brave you can do this right away, I like to unplug the old boot disk and reboot from the SSD to make sure everything is working. After you are sure the new SSD boots into Windows, plug the old hard drive back in and boot into GParted again. You should now just remove all partitions from the old disk to free up the space and make sure you don't accidentally boot to the wrong Windows. (Don't worry about new partitions, you can do that from the Windows disk manager).

Step 10 - Reboot into Windows

Done! Unplug the GParted USB-Key and boot the PC. You will be greeted by checkdisk, but once done you should see a very speedy boot into the old desktop. Now you can use the disk-management tool inside Windows to create a partition on the old disk and you are done.

Everything works as before, you just saved yourself countless hours of reinstalling every spyware/malware the relative has accumulated over the last few years.

Filed under howto, computers

My Photography business

Projects

dynamic css for .NET

Archives

more